Zeiss Ikon Contax Camera Repair
A home for your Zeiss Ikon Contax, Contarex or Super Ikonta camera!
Body:
- What Condition is Your Camera In Now?
- What is the Contax?
- Contax Shutter Accuracy in a Camera Today?
- What is Shutter Bounce or Blanking?
- What is the Difference Between a Black Dial and a Color Dial Camera?
- Can a Black Dial Camera be Converted to a Color Dial Camera?
- Can Anything be Done for a Gouged Eyepiece Bezel?
- Why is Zeiss Chrome so Bad?
- Can Anthing be Done for Bad Paint?
- Can I have a Camera Custom Built?
- How Should I Care for My Contax?
- The Illustrated Camera
- Why is Zeiss Chrome so Bad?
Rangefinder:
- The Rangefinder Wheel is Hard to Operate, What is the Cause of This?
- The Focusing Helical Seems to Have a Lot of Clearance, is This Normal?
- Why don't the images in my viewfinder and rangefinder line up right?
- The rangefinder image is badly faded, can it be restored?
- My Pictures are Fuzzy. Is it the Lens or the Rangefinder?
- There is a Defect in the Rangefinder Image, Can this be Corrected?
Shutter:
- Pictures of a Shutter Disassembly
- Pictures of a Shutter Assembly
- Why Does the Color Dial Model Shutter Not Release Sometimes?
- What are Shutter Tapes?
- What is Shutter Capping?
- What is Shutter Bounce?
- My shutter appears bent, what causes this?
- Shutter Cocking and Film Advance
- How do you clear a Jammed Camera?
- Why Does the Self Timer Interfere with 1/1250 Speed?
- How are Shutter speeds set on a IIa or IIIa camera?
Lightmeter:
- The IIIa Lightmeter Explained
- My IIIa LIghtmeter Doesn't Respond to Light At All, Can This be Repaired?
- The Needle on My IIIa LIgtmeter Sticks, Can this be Repaired?
- The Response of My Lightmeter to Light is Intermittent, Can this be Repaired?
- Can the IIIa Lightmeter Photocell be Rejuvinated?
Lenses In General:
- How Should a Lens be Cleaned?
- What Can be Done for a Filter Ring Dent?
- What is an Opton Lens?
- What is a Red "T" Coating?
- What is the difference between a Zeiss Opton and a Carl Zeiss Lens?
- Why are there Bubbles in the lens elements in my lens?
- What is Lens Fungus and What Can be Done About it?
- There is Oil on the Aperture Blades, is this Important?
- Can a Badly Scratched Front Element Surface be Repolished?
- What is Lens Element Separation or Cement Failure and What Can be Done about it?
- Can Nikon Lenses for the Nikon Rangefinder Cameras be Used on Contax Cameras?
- Can Jupiter Lenses for the Russian Rangefinder Cameras be Used on Contax Cameras?
- The 85mm f4.0 Sonnar
Leather:
- Where Can A New Camera Case Be Found?
- What are Zeiss Bumps?
- Can Zeiss Bumps Be Removed?
- Can Damaged Original Leather Be Replaced?
- "Zeiss Bump" Removal from Leather
Emergency:
Overhauling A Contax IIA/IIIA - Lenses

The Schott Glass Works as it Appeared in 1926 - Click on the Picture to get a High Resolution View
How Should a Lens be Cleaned?
Rule number one which must never be violated is never use lens tissue. Just to make sure you remember it, here it is again, "Never Use Lens Tissue". Lens tissue is made for the sole purpose of packaging individual lens elements in a manufacturing environment. It is not made for cleaning lenses and will scratch your lens. Do not ever use it. Please do not believe the marketing statements about it. Lens tissue will destroy your lens faster than anything else you can do.
The best way to keep your lens clean is to purchase a UV filter and then to clean it when it gets dirty. It is relatively inexpensive to replace a filter if it should be scratched. In most cases it is prohibitively expensive or even impossible to obtain a replacement front element. Please don't take any heed of the arguments that a front filter is unnecessary or expensive. You can always replace it if it gets scratched or damaged and this is its only function in my opinion. It will take all the abuse of repetitive cleaning and you can learn all the lessons you need on a good filter. When purchasing a filter buy the cheapest one you can find. They are all about the same. You would have to work very hard these days to find a bad filter.
If you must clean your lens the first thing to do is to make sure there is no grit on it. If there is grit on the lens when you polish it the grit will scratch the element surface. So the first thing to do is to use a fine brush to gently brush the lens to remove any grit. DO NOT SKIP THIS STEP! If you have a compressed air blower handy, you can use this to remove any potential grit as well.
Once you are sure there is no grit on the lens, if there are any finger marks or smudges, the next step is to clean and polish it. The best thing to use to clean the lens is non aqueous film cleaner. You don't need to use much. Use a small cotton swab moistened with the cleaner to remove any fingerprints or other smudges. GENTLY move the swab in a circular motion around the lens. It may take one or two applications to get the lens perfectly clean. Don't worry if the evaporation of the last bit of solvent leaves a mark. This is of no photographic consequence. If you don't have any film cleaner on hand use an aqueous cleaner in accordance with the next paragraph.
If your lens is so dirty that you need to use an aqueous cleaner keep one thing in mind. In most lenses the front and rear elements are not waterproof sealed. This means that if you apply too much liquid it may enter the lens barrel from the lens edge and stay there a very long time. This can cause rusting of the aperture blades and/or fogging of the internal elements due to condensation.
The best aqueous cleaner to use is lens cleaner that is available at most drug stores or in the drug section of most supermarkets. Apply it and polish the lens using a piece of very soft cloth that has been recently laundered. An old "T" shirt will do. It is a good idea to take a new "T" shirt, launder and dry it separately, and then keep it in a sealed plastic bag for emergencies. If it is a real emergency, and lens cleaner is not available use a commercial glass cleaner such as Windex; but do not make a habit of using this sort of cleaner because it is too harsh on the lens coating. Avoid Tap water. Tap water contains a lot of rust and grit particles from the piping and the use of it can easily damage a lens.
Remember always that the coating on a lens is extremely thin and fragile. It was applied to the glass in a vacuum and is even more easily scratched and damaged than the underlying glass. When you clean a lens, this is the surface you are touching and it cannot be repaired.
What Can be Done For a Filter Ring Dent?
A filter ring dent is actually severe lens damage. If it is not corrected properly the lens will one day be useless because it cannot be serviced. The reason for this is that the damage to the threads makes it impossible to remove the lens bezel. If the bezel cannot be removed it can be very difficult, if not impossible to disassemble the lens to correct problems.
There is no sight more tragic than the front end of a 50mm Sonnar that has been badly scarred from well meaning incompetent repair work. There are many tools that have been designed and sold having the purpose of repairing filter ring dents. But all of them leave their mark. And while some of them will restore the ability to screw a filter onto the front of the lens, none of them will restore the threads further down the barrel which must be in good condition to allow the bezel to be removed. And the use of all of these tools leave an unsightly surface. Even in the hands of a master it is impossible to restore the original appearance of the lens using tools that one can buy.
My method of removing filter ring dents is to restore the lens to its original appearance and function. I have custom designed and built custom tools for this purpose that are specific to the lens of concern. If the lens is so damaged that the old ring cannot be restored I will custom machine a new lens filter ring barrel. Repairs can also involve something as simple as removing the filter ring barrel, turning it around and reinstalling it so that the damaged portion is hidden inside the lens. The simplest solution will be applied to your lens.
The economic benefits of a perfect repair to your lens are large. A 50mm 1.5 Carl Zeiss Sonnar sold on Ebay with a filter ring dent will sell for around $65.00. In perfect condition the same lens sells for $215.00. The dent makes a $150.00 difference! This effect is magnified if the dented lens is on the front of a IIa or IIIa camera body when it is sold. In this case the dent can easily make a $300.00 - $400.00 loss if the body is extremely nice. You will find my rates are very reasonable for lens repairs. And if the repair of your lens requires the manufacturing of a special tool you do not pay for the tool. I consider it my cost of doing business and an investment in the same type of work in the future. You pay only for the labor and materials applied directly to your lens.
If you have a Zeiss lens with damaged or disfigured filter ring, even if it has been "repaired" by others, and you want it made right, please contact me.
What is an Opton Lens?
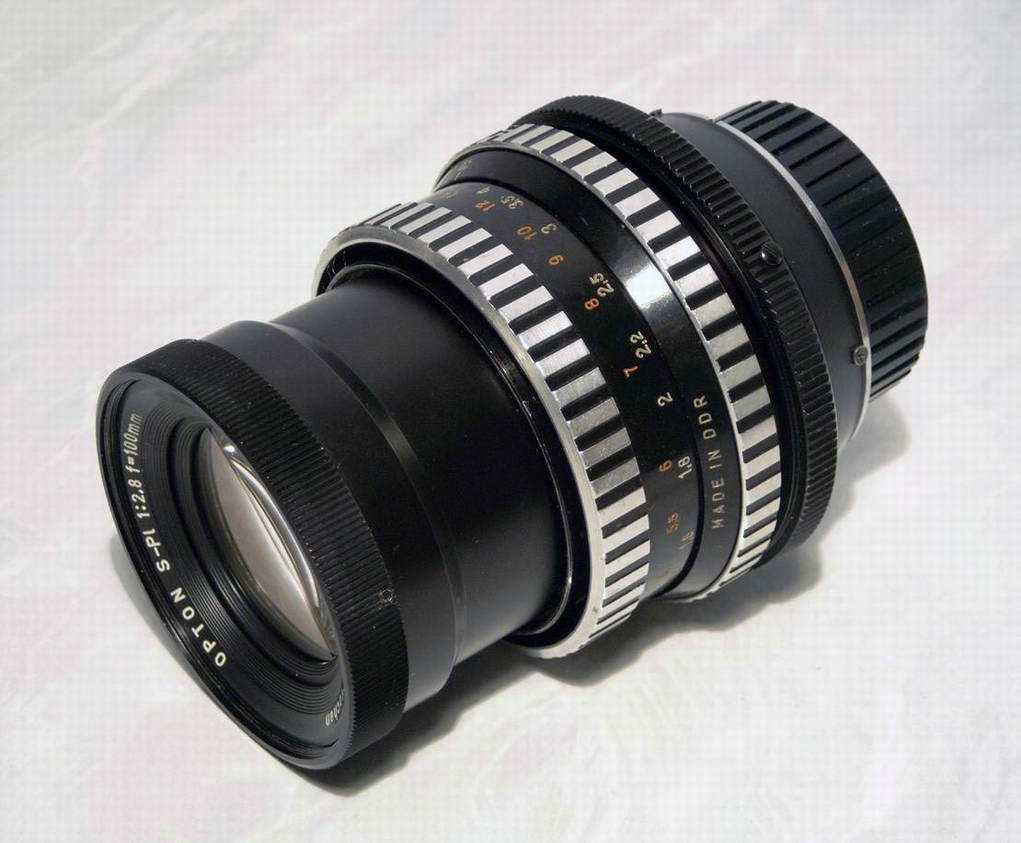
The discussions about what "Opton" actually means will probably circulate forever. But some recently available information has come to light that sharpens the focus of this topic. A book concerning the post war history of Zeiss has been published, but it is in German and has not yet been translated into English. But a very good synopsis of it in English has been published by Zeiss on their official web site and you can use this link to go there and read it for yourself: Zeiss History. This synopsis says that before the war Zeiss was a legal entity called a Foundation and the foundation held all of the rights, patents, property, factories and everything else Carl Zeiss. Just at the end of the war a group of Zeiss executives had the Zeiss-Opton company legally chartered in the American Occupation Zone. Shortly thereafter East Germany was founded by the Soviets as a communist state called the German Democratic Republic (DDR). The DDR nationalized all of the Zeiss assets within its borders which effectively wiped out the Zeiss foundation leaving only the Zeiss-Opton company in West Germany as a legally existing entity according to western law. Following this, East and West Zeiss fought each other in just about every court of law in the world over the rights to use the Carl Zeiss Trademark up until the time the DDR collapsed. During this time both East and West Zeiss used each others trademarks. The next picture is of a lens I found for sale recently in a Russian camera shop. Notice that it is marked both "Opton" and "DDR" meaning that is a lens made in Jena but marked Opton. It's also important to note this lens is made entirely of aluminum which is a characteristic of East German manufacture. The appearance of this lens is late 1960's.
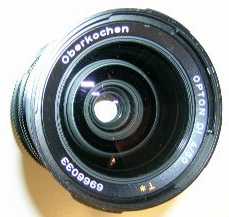
This picture is of a more recent version of the Hasselblad 50mm f4.0 CF Wide Angle lens. Notice that it's marked both Opton and Oberkochen. It is a style made from the 1980's up until the present time.
Just about everything that Carl Zeiss West made for sale in the West (America and its allies) was also made for sale in the Communist Block. So there are items labeled Zeiss Opton and Oberkochen Opton that are identical to items labeled Carl Zeiss from all times of manufacture up until the unification of Germany. It is not possible to make any generalizations about these lenses or other Carl Zeiss products based upon the trademark Opton or Oberkochen. But it is possible to make comparisons between Carl Zeiss and Carl Zeiss Jena.
The original Zeiss lens plant was located in the town of Jena. Jena was a center of lens making from the earliest days of microscope making and was the site of the original Zeiss lens factory. Zeiss lenses made before World War II are marked "Carl Zeiss Jena". After the War, the Jena factory kept working under the Communist government. This factory also made lenses for the Contax camera, and they were marked "Carl Zeiss Jena" whereas lenses made in West Germany were marked "Carl Zeiss". Now, pre-war lenses are also marked "Carl Zeiss Jena", so it can be somewhat confusing. It is sometimes not easy to tell a pre-war Jena lens from a post war Jena lens, except that the lens barrel and internal lens mounts of a pre-war Jena lens were made of brass, and most made after the war were made of aluminum with the exception that very rare wartime lenses made under military contract were also made of aluminum.
The one and only thing that is of photographic importance in all of this is that lenses made by Zeiss West which are labeled either Carl Zeiss or Zeiss-Opton or Opton Oberkochen are exactly the same in all respects. There is no optical or mechanical difference.
What is a Red "T" Coating?
Zeiss invented lens coating prior to World War II and it was kept as a military secret until after the war. The first coated glass elements appearing in the Zeiss cameras is the window covering the prism windows in the Contax II and III cameras. Coated lenses started with the 50mm f.1.5 Sonnar. The very earliest coated lenses bear no marking to indicate they are coated. These lenses generally look very bad because the coating technology used on them was experimental and was dropped. Zeiss experimented with several types of coating technologies and the earliest of these was a water based process that produced very thin streaked coatings. When Zeiss discovered the vacuum evaporation coating process and began to use it the coated lenses were still not marked. The only way to tell they are coated is to look at them to see the bluish tint of the coating on the front element. These lenses are wartime made lenses and are marked "Carl Zeiss Jena". The vacuum evaporation original coating procedure did not apply the same coatings to all the elements in a lens. The coatings on the exposed surfaces of the front and rear elements were relatively hard and resistant to cleaning damage, but the coatings on the inner surfaces of the lens elements are incredibly soft and can be damaged merely by touching them with a cotton swab. Shortly before the end of WWII Zeiss began to indicate coated lenses by placing a big red dot into the front lens bezel. This marking is extremely rare. The more common coating designation is the engraved red "T" symbol into the front lens bezel. In the original lenses so marked, the coatings were the initial type with hard coatings on the external surfaces, and easily damaged soft coatings on the internal surfaces. You can be sure a 50mm Sonnar lens has soft internal coatings if it is in the style of the original Sonnars made for the Contax II and III. These are generally all chrome, with the aperture control being smooth and not knurled, located at the very end of the lens, and having two little tabs opposite to each other. As time progressed after the war and into the late 1950's, the red T designation was dropped because just about all lenses made by all manufacturer's were coated and coatings became normal.
After World War II Zeiss was split into two. The original Zeiss lens factory in the town of Jena was in the Russian occupied section of Germany. It continued making lenses with the red "T" marking and the soft internal coatings. Lenses made in Jena in Eastern Germany, later the German Democratic Republic (DDR) were continued with the pre-war marking of "Carl Zeiss Jena" and the red "T". It is not clear when the Jena factory switched to hard coatings inside and out, but they did and continued with the red "T" marking. You have to look into a "Carl Zeiss Jena" lens with a red "T' to see if has soft or hard internal coatings. The coating does not go to the edge of the internal lens elements and there is an uncoated annular area on the edge of each lens element that can be seen if you look for it carefully.
After World War II The Zeiss company in the American occupied zone opened a new lens factory in the town of Oberkochen. Lenses made in Oberkochen were initially marked "Zeiss-Opton", and carry the red "T". All lenses made in Oberkocken have hard coatings inside and out. Later the Oberkocken lenses dropped the "-Opton" and changed the name to "Carl Zeiss". When this name change happened the red "T" was also dropped. All lenses marked "Carl Zeiss" are hard coated inside and out. This applies for the Biogon, and all other focal lengths.
The issue of identifying a lens precisely can become confused by the fact that Carl Zeiss Jena made copies of the Carl Zeiss lenses after the war that are duplicates of the same lenses that were made for the Contax cameras by Carl Zeiss at Oberkocken. So don't be too surprised if you should someday purchase a Contax and find a lens on it that is coated but which is of a style and markings entirely different from those described here. I know that I'm still being amazed by the things that show up on the cameras customers send me to be repaired.
A sure way to tell if a lens has the soft internal coatings is to look into it with a magnifier. The internal surfaces were not coated to the edges, and there is an outer annular region on the internal surface of the front element that is not coated. The edge of this uncoated area is a little beyond the lens bezel and can be seen with a magnifying glass.
You have to watch out for a unmarked coated lens or "T" marked coated lens with soft coatings that has been serviced by a person unequipped to handle these lens elements without damaging them. It is normal for people who have found out they have damaged the coatings to remove the internal coatings completely. This can be done easily and quickly with a soft cloth. In such a lens there will be a hard coating on the external surfaces, and no coating on the internal surfaces. It's hard to tell such a lens by itself. But if it is held next to a coated lens with the internal coatings intact, the lack of coatings on the internal surfaces will immediately become evident by comparison.
Coatings can be restored at a cost of about $65.00 per lens surface.
Be very careful about buying a lens with soft internal coatings. If you buy such a lens you will need to be especially careful about who you have service the lens. Most people who service such lenses will simply remove the internal coatings rather than live with the problems of cleaning them properly so the coatings are preserved.
What are typical Lens Problems?
I have serviced a large enough number of various Carl Zeiss Jena, Carl Zeiss and Zeiss-Opton lenses made for the Contax camera to know the types of problems they tend to have. There are a number of typical problems.
Sometime in the 1960's Carl Zeiss (West) decided to experiment with the use of Epoxy type lens cement. Previous to this change the type of lens cement used was a natural purified tree sap called "Balsam". There is a big difference between the two types of lens adhesives. Balsam basically never hardens completely. Being tree sap it's always sticky. But it melts at a fairly low temperature of about 140 degrees Fahrenheit. The Epoxy type cement hardens completely and continues to harden and cure for a great many years until it's finally just one huge molecule. As it hardens it tends to loose its stickiness and will separate from the glass. This separation can be delayed for a very long time if a bead of the epoxy is left at the exposed part of the lens joint, but Zeiss didn't do this and so over time the lenses that have been cemented together with epoxy type cement tends to start separating from the edge. The iridescent edge separation one sees in many later lenses marked "Carl Zeiss" without the red "T" designation is caused by separation of the epoxy cement.
Balsam cemented lenses are subjected to darkening from high temperature oxidation, and to separation indicated by large bubbles in the center of the lens, which typically appears when the lens is exposed to temperatures in excess of 180 degrees Fahrenheit. Epoxy cemented lenses are subject to the iridescent edge separation which can occur instantaneously at any time without any warning. Epoxy cemented lenses tend to separate when they are temperature shocked by being moved from a high to low temperature environment.
Zeiss continued using the epoxy lens cement in the Contarex lenses.
There can be a problem is with the iris mechanism on the Carl Zeiss (West) or Opton 85mm f2.0 lens. This problem is not evident to most buyers because the oil on the iris blades masks the problem. It only becomes evident when the lens is serviced and the iris mechanism is cleaned of its oil and is dried. When the oil is removed I have noticed that in about one of every four lenses the iris mechanism will not open to full aperture. In every case the iris has stopped opening about one stop from full open. The problem is due to wear. The top plate of the aperture control mechanism has grooves in it and little steel pegs in the aperture blades slide in these grooves when the aperture control is rotated. In the 85mm Sonnar the top plate is made of aluminum and so the combination is steel pegs in aluminum grooves. When the wear to the grooves goes beyond a certain point, the pegs begin to stick and so lubrication is necessary. This is why an old lens with oil on the blades will not disclose this problem to the buyer. The solution is to apply a very small amount of very fine oil to the iris mechanism pivot points for each blade. There is no mechanical solution. When a lens is overhauled here a special chemical treatment is applied to stop the oil applied to the blades from moving away from them and so the oil will not move into the lens, but will stay on the aluminum plate allowing the lens to operate properly.
There can be a problem which is most photographically significant, is severe misalignment of the central element in its frame in the postwar 50mm f1.5 Sonnar lens. In pre-war 50mm Sonnar f1.5 lenses the central element fits into the lens barrel as bare glass element. So there can be no misalignment. It fits precisely in its precision machined barrel as do the other elements. In the postwar Carl Zeiss and Opton lens, the central element is fit into a separate brass frame. The brass frame is made of two parts, one is threaded male and the other female so that the central element is held tightly in its frame when the two parts are screwed together. The problem comes about because the threads may be badly formed on one or both pieces of the frame. When this happens the assembler will have tightened the frame parts until they bind, which is well before they would seat with each other normally. And in order to keep the lens from rattling in its frame, an excess of lens blacking paint is used to "glue" it into place. In every such case the element has been glued in an improper position resulting in a lens that cannot take a good picture. I am convinced there are many "MINT" condition Contax cameras in the world with an Opton or Carl Zeiss lens on it that is fuzzy, and the owner was convinced it was a problem with the range finder that could not be corrected. It is possible to correct this problem completely.
While the outside appearance of the postwar 50mm f.1.5 lens remained the same throughout its production life the inside changed a great deal. Zeiss kept experimenting with the mount of the front element and central triplet. My feeling is that they did this in an attempt to obtain the best possible optical alignment of these two elements. In the very last production lenses both the front and central elements are held in a single brass frame. In the earlier versions the front and center elements are held in separate mounts that fit into each other.
Why the Bubbles in the Lens Glass?
Modern glass making has changed a lot in modern times. It wasn't so long ago that the bubbles in the glass were a sign the lens was of the highest possible quality. How quickly we have gotten used to photographic lenses that do not have bubbles in them. When optical glass is made all of the ingredients are mixed in a container that can take high temperatures called a crucible. The ingredients are melted at very high temperature. Even when it is melted, glass is very viscous and thick. When the melted ingredients are stirred to mix them together, the mix tends to pick up air which forms bubbles and the ingredients used in the older optical glasses tended to generate gasses as they melted. The bubbles are removed from the glass by allowing the crucible to sit in the high temperature furnace while the bubbles rise to the surface of the melted glass. Up until about 25 years ago the materials of which crucibles for optical glass making were made could not withstand the effects of the extremely high temperature at which glass is made for very long. There was a time limit on how long the crucible could stay in the furnace. In order that the crucible not fall apart it was necessary to remove the crucible from the furnace before all of the bubbles had time to rise through the melted glass and escape from it. Another problem is that the melted glass was corrosive to the inner surface of the crucible. It was necessary to remove the crucible from the furnace before corrosion of the inner surface of the crucible caused impurities to ruin the batch of glass. Another problem is that making the highest quality optical glass required higher temperatures than did lower quality optical glass. So it was possible to make lenses without bubbles, but only if the glass was of a lower quality. Back then, no bubbles in the glass meant it was cheap.
The overall effect of these factors was that for a very long time small bubbles in the glass of a lens were an indicator of the highest quality. It is still such an indicator today for lenses which were made prior to around 1975. Sometime around 1975 crucibles for optical glass making were developed which could withstand the high temperatures required for making the highest quality optical glass long enough so that the molten glass could be left in the furnace until all of the bubbles had risen out. These crucibles were also resistant to the corrosive effects of molten glass on the inner surface of the crucible. Since then high quality optical glass has been virtually bubble free.
So when you are looking deep into a Zeiss lens for your Contax camera, and you see some little bubbles deep inside, rejoice because you have found a rare and special jewel that will take most excellent photographs. The bubbles are photographically insignificant and do not affect the quality of the pictures the lens will take. They are merely an indicator of great quality.
Also keep in mind that when a lens blank contains bubbles it is only natural that during the grinding and polishing process where glass is removed that some of these bubbles will become partially exposed. These exposed bubbles will appear to be small tiny pits on the surface of the glass on both the front and rear elements. These are natural, to be expected and cannot be avoided. They are an artifact of the lens glass being superior.
What is Lens Fungus and What can be done about it?
There are many forms of fungus that like to live in conditions where the oxygen level is low, and where there is petroleum oil to consume. The conditions are perfectly provided in a lens which has been in storage for a long time, or which is otherwise sealed so that fresh air cannot easily enter it.
The grease used to lubricate the aperture control ring threads tends to separate into its basis oil and other components over time. Most lenses made in the 1950's, and which have not been serviced since them contain separated grease. The oil that separates from the grease spreads through the lens and coats all surfaces of the lens elements. This thin layer of oil over glass is an ideal spot for fungus to grow.
There are basically two types of fungus. There is oxygen loving fungus, and fungus that grows only when there is little oxygen. There is a big difference in the effect of these two fungus types. Oxygen loving fungus gives off carbon dioxide as it feeds and digests its food and is relatively harmless, and the other type of fungus gives off liquid acid. It is this acid that can etch the pattern of the fungus into the coating of the lens upon which it grows.
A lens that is used often, and has an action which tends to facilitate the exchange of fresh air into the lens, will usually become colonized with the oxygen loving form of fungus. This oxygen loving fungus does not produce acid, and can usually be cleaned from the lens without any damage to the lens coatings. This is what usually happens with Zoom lenses or fixed focal length lenses with long focusing helicals. The normal appearance of this type of fungus is like a haze of fine filaments growing in the air space between the lens elements.
A lens that is sealed, such as a 50mm f1.5 Sonnar or f2.0 Sonnar, will usually develop the type of fungus that grows when the oxygen level is low. This acid producing type of fungus typically grows on the element surface itself. It usually takes a clear and crisp fine branch like form spreading from the edge of the lens elements inward toward the center. The acid generated by this fungus has a number of bad effects upon the lens. The most obvious effect is etching of the lens coating. If left to grow too long this etching can attack the glass surface itself. The acid also tends to weld the threaded elements of the metal lens parts together with a film of corrosion. Lenses that have had an acid fungus infection can be extremely difficult to take apart to clean. The acid can also etch patterns into the aperture blades and cause cracking of the blades. Acid will also remove plating on brass parts, and etch aluminum parts making them impossible to separate.
Removal of the fungus must be thorough. Each and every part of the lens must be cleaned so that it is disinfected. If the lens is not disinfected, the fungus will continue to grow once the lens is resealed. It is also important to remove all traces of the original lubricant and replace it with synthetic lubricants that are highly resistant to mold growth.
It is possible to restore many fungus infected lenses to perfect condition. Some, sadly, are unsalvageable because the threaded components have been permanently welded together by acid corrosion of the fine threads. The only way to find out if your lens can be saved it to have it examined as quickly as possible after you notice the fungus growth in it. Time is of the essence with a fungus infected lens. It is important not to assume that a fungus growth has taken a long time to develop, or that there is time to wait. A week or two of delay can make the difference between a valuable lens perfectly restored and one which is only good to be cut apart so that the lens elements can be salvaged for parts.
If your lens has fungus, write me now. Don't wait.
Can Lens Scratches be Corrected by Re polishing?
It is possible to re polish the front or rear element of a lens. This is a fairly drastic technique to use on a lens. It is not possible to reverse it if the results are not good. Hence it is usually appropriate to re polish a lens only when it is so badly hazed due to cleaning scratches that it cannot produce an acceptably sharp image otherwise.
When a lens surface is re polished the figure of the lens element is changed. If one is very very lucky, the lens was originally out of specification and the polishing will actually bring it into a closer correspondence with the ideal figure. But in most cases this will not happen and it is generally not the result that the lens is restored to its original sharpness performance potential. But, in most cases, a lens that produces a fuzzy picture can be restored to produce pictures that are acceptably sharp. There are two compensations.
The first is that it has been my experience that most lenses for the Contax cameras were not critically adjusted for focus in their mounts at the factory. My experience is that most normal 50mm lenses are at least 3 to 4 feet out of adjustment towards infinity. This simply means that when the range finder is indicating 10 feet the lens is focused at 13 to 14 feet. Mostly this goes unnoticed because most people rarely use a lens at its full aperture and so depth of field usually covers the gap. But after a lens is re polished I critically focus adjust the lens at full aperture and this usually obtains a degree of compensatory focus adjustment sharpness which compensates for the loss of it due to the deterioration of the lens surface that has been scratched and re polished
The second compensation applies to the 50mm f2.0 Collapsible Sonnar. Most people who use this lens use it incorrectly. When it is mounted on the camera it is necessary to twist the lens barrel counterclockwise (facing the camera front) to seat the lens in the camera mount. Following this it is necessary to twist it clockwise to set the lens barrel firmly into the lens mount and set the lens firmly into its three infinity locks. Most people who use this lens fail to twist the lens clockwise after it is mounted on the camera, and the result is it is used out of alignment. This deficit is approximately another 4 to 5 feet towards infinity. I think this explains the poor reputation of the lens. It is truly a superlative lens and is razor sharp, but it must be twisted clockwise after it is mounted to the camera to get this performance. A critical adjustment followed by proper usage after a front element polishing usually produces a great improvement in the original performance of the 50mm Collapsible Sonnar lens.
What is Lens Element Separation/ Cement Failure and What can be done about it?
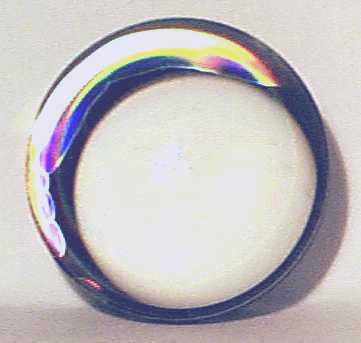
The Zeiss Sonnar 50mm f1.5 has six lenses in three groups. There is one group of two cemented elements, one of three cemented elements, and one of one un cemented element. When lenses were cemented together from the beginning of photography and up until the most recent times, the cement used was balsam, which is a form of highly refined resin obtained from pine trees found in Canada. Balsam softens as it warms. Lenses were cemented at a temperature of about 150 degrees Fahrenheit and then allowed to cool. The nice thing about balsam is that errors in the lens element positioning can easily be corrected by heating the lens to about 125 degrees Fahrenheit, and the carefully manipulating the lens. The bad thing about balsam is that a closed car in summer can get hot enough to cause the balsam to melt and for the lenses in a cemented group to separate. The following picture is of a 50mm f1.5 Sonnar that spent too much time in a closed car in Summer:
The group of bubbles in the center of the lens is not fungus. It is cement failure. The lens got hot enough for the balsam to melt and to allow bubbles of air to come in from the side of the lens. The failure in this lens is not in the front element. It is in the second element that is made up of three lenses cemented together. I know it looks like it is in the front element, and that some people call this fungus, but it is definitely not fungus and is not in the front element.
There is a fix for this problem. The lens must be disassembled. The center element must be removed from its brass frame, cleaned of its black paint, then separated into its three individual elements. Then these must be each cleaned of residual balsam, and reassembled using modern lens cement that hardens under ultraviolet light. Assembly must take place in a very clean area using a special high precision alignment jig to make sure all three elements are properly aligned before the new cement is permanently hardened.
If your Sonnar has this problem it can be repaired and the lens restored to perfect quality. Write me.
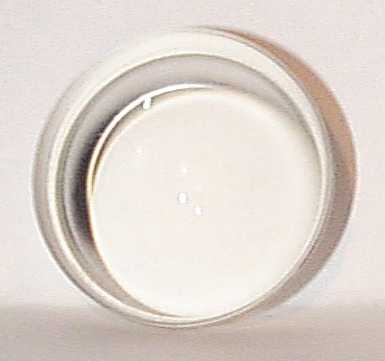
There is another lens problem that involves the cement. Zeiss experimented with the use of Epoxy cement to join lens assemblies during a period of several years in the 1960 - 1970 period. The problem with the epoxy cement is that it becomes too brittle with time and partially separates from one of the lens surfaces. This is a fairly common defect. This type of separation looks like an iridescent crescent at the edge of the lens. Recently I have developed a method of correcting this problem. The following two pictures show a before and after center triplet from a Carl Zeiss 50mm f1.5 Sonnar:
If your lens has this problem and you want it to be corrected write to me. I have a process that allows epoxy cemented lenses to be safetly separated using chemical means that do not affect the coating or any other aspect of the lens in any way. Recently, new lens cements have become available which allow the lens to be carefully positioned as it cured to allow the most accurate possible lens centering. If you have a separated lens that needs repair you can email me at superwide@earthlink.net or you can use this link:
Oil on the Aperture Blades, Is this Important?
Oil on the aperture blades means that the damping grease used to lubricate the aperture control threads has deteriorated and has disassociated. Damping grease is used to give camera controls their smooth positive operation. The oil on the blades is an indication that there is also an oil film on the outer surface of the inner lens elements. The oil film is not usually visible on the external surfaces because the lens elements sit tightly enough in their mounts to provide a good seal between the inside of the lens and the outside elements, so the oil tends to stay in the inner section of the lens.
This oil film on the inner lens elements severely deteriorates the photographic quality of the lens. The reason for this is that the lens elements were formed with the most extreme precision to bend the light properly with clean and dry surfaces. Even a microscopic oil film will ruin the performance of the lens. Typically this oil film is not visible to the naked eye under normal light.
The oil can serve as a source of food to mold and bacteria. Once this growth is established, damage to the coatings quickly follows.
The oil can become acidic and cause cracking of the aperture blades. All of the instances of such cracking have been in the vicinity of the aperture blade pin. This damage is not repairable because repair parts are no longer available. The oil will mask the presence of this damage because it also lubricates the blades so that they will slide over each other easily and will not get caught on the crack in other blades.
It is imprint to have your lens serviced if you notice oil on the aperture blades with one exception. If your lens has been serviced here, the aperture was cleaned and found to stick due to wear, and oil has been applied to stop the sticking then there is no problem.
Can Nikon Lenses be Used on Contax Cameras?
The lens mount on the early Nikon S series of rangefinder cameras as well as that of the very recent Nikon S limited edition commemorative camera is identical to that of the Contax I, IIa, IIIa, II and III camera bodies. Unfortunately, there is a 0.32 mm thickness difference between the Nikon rangefinder body and the Contax rangefinder body. This will cause a rangefinder to lens mis-match when Nikon lenses with focal lengths greater than 50mm are used on Contax cameras or when Zeiss lenses are used on a Nikon camera. The only exception to this are 135mm and wide angle lenses made by Nikon expressly for the Contax cameras. These lenses are marked on the barrel with an engraved red "C" to indicate they are calibrated for use on Contax cameras. It is normal for all Nikon Nikor lenses with the Contax type mount to have a red "C" marked on the lens bezel to indicate the lens is coated. For example: the designation of the 35mm f2.5 Nikor Lens for Contax is "W-Nikor-C".. Zeiss made no lenses for the Nikon S camera.
I purchased a Nikon S camera, disassembled it and compared the focusing mechanisms and bodies. If you would like to read about this study you can use this link:
Nikon And Contax Focusing Helical Comparison
Russian Jupiter Lenses
There have been an increasing number of ever cheaper Russian made Jupiter lenses on the market lately. The one thing to keep in mind is that the Jupiter wide angle lens is not a Biogon and the 50mm f1.5 lens is not a Sonnar. Mechanically they are extremely rough. Large amounts of extremely thick damping grease hides the the roughness of the helical threading.
Optically the quality varies widely. You can easily obtain a very bad lens or a very good one. There's just no way to determine the lens optical quality from its external appearance. The only way to find out the quality of the lens is with the camera and with film, and by then it may be too late to be able to return it.
If you find your recently purchased Russian lens will not focus at infinity this can usually be corrected.
The 85mm f2.0 Sonnar
The 85mm f2.0 Sonnar is the lens about which I receive the most inquiries. It is the lens people tend to want to purchase as their first accessory lens following the purchase of a camera body with a normal 50mm Sonnar or Tessar lens.
All versions of the 85mm f2.0 Sonnar are color corrected. This includes the 85mm f2.0 Sonnar made in 1932 for the Contaflex TLR up to the last production 85mm f4.0 Sonnar made in 1964. In modern words "Color Corrected" means "APO". An 85mm f2.0 Sonnar can be used to make very high quality color split negatives for the antique methods of color printing such as Tri-Color Carbo or Dye Transfer and it will provide excellent results with modern color films like Kodachrome. The only effective difference between all the various 85mm f2.0 Sonnar versions is coating. Coating greatly reduces flare but has no effect upon the color correction of the lens.
There are basically six 85mm f2.0 Sonnars. These are:
- The Contaflex TLR version made before World War II. Marked Carl Zeiss Jena.
- The Contax I black paint version made before World War II. Marked Carl Zeiss Jena.
- The Contax II and III chrome plated version made before World War II. Marked Carl Zeiss Jena.
- The Contax II and III chrome plated coated Wartime version. Marked Carl Zeiss Jena with a red dot.
- The Contax IIa and IIIa aluminum lacquered body with T coated optics. Marked Carl Zeiss Jena with a red T.
- The Contax IIa and IIIa aluminum chrome plated body with T coated optical. Marked Carl Zeiss with our without a red T or Zeiss-Option with or without a red T.
The following discussion will be concerned only with the postwar lenses, versions 5 and 6 above.
Zeiss officially restarted Contax rangefinder camera production following the end of World War II with the Contax IIa. It was introduced to the world at the 1951 Photokina. The Contax IIa body was manufactured by Zeiss (West) in Stuttgart, and the lenses were produced by Zeiss (East) in Jena. The initial lenses and other optical accessories made for the Contax IIa were made in Jena.
The Postwar Carl Zeiss Jena T Coated 85mm f2.0 Sonnar:
The first 85mm f2.0 Sonnar made for the Contax IIa was the Carl Zeiss Jena T coated lens. It is an extremely sharp high contrast color corrected lens. There is almost no Zeiss literature available about it and so it must be assumed that the optical characteristics of this lens were intended to match or be better than the pre-war 85mm f2.0 lens. It is typical for this lens to have a variety of small original factory cosmetic optical defects such as bubbles in the glass, residual grinding marks, inclusions in the optical cement and coating defects. But in spite of these this lens is the best performing 85mm f2.0 Sonnar ever made by Zeiss. The insignificant cosmetic optical defects are a consequence of the very bad industrial, societal and political circumstances in Germany at that time. Germany had been totally smashed to pieces during the war and this lens was being made in factories that still did not have windows in them. But, in spite of these difficulties, the lens making artists at Jena did as all truly great artists do in hard times; they produced stunning paramount works of the lens making art. This lens is very rare because political developments in Germany quickly made it impossible for the Eastern and Western Zeiss companies to openly cooperate. It is almost impossible to find one of these lenses in pristine external cosmetic condition. Being a truly great lens it got used a lot. Lenses that get used a lot tend to look like they were used a lot.
The Postwar Carl Zeiss or Zeiss-Opton 85mm f2.0 Sonnar:
I am having lenses presented to me for overhaul that indicate there is a strong possibility that Zeiss issued two versions of the postwar 85mm f2.0 Sonnar made in Oberkocken.
The First Version:
The second 85mm f2.0 Sonnar made for the Contax II was made at the Zeiss factory in Oberkocken. It appears that with the appearance of this lens production of the Jena version ceased. This lens is marked either Carl Zeiss or Zeiss-Opton. Early production is marked with a red T and later production does not have the T mark. There is a lot of Zeiss literature about this lens. Zeiss advertised it to be a "Portrait" lens. At that time when a lens was called a Portrait lens this meant it was a soft focus lens. This lens is a soft focus lens. I have only seen one that focused as sharply as does the Jena version. The fact it is a soft focus lens explains to me why it is so easy to find one of these lenses in almost pristine exterior cosmetic condition. Soft focus lenses don't get used much. These lenses were made later during the German postwar recovery period and so don't tend to have so many optical cosmetic defects as do the earlier production postwar Jena lens. This lens tends to have aperture blade defects which require lubrication of the aperture blades to correct and allow the aperture to open fully. Being chrome plated over aluminum the chrome plating tends to suffer badly if the lens has been stored in high humidity circumstances.
The Second Version:
Over the past five years I have examined two Oberkocken made Zeiss-Opton marked 85mm f2.0 Sonnars which were made to allow the focusing of the lens to be set so that the lens is not a soft focus type. Both of these lenses were externally in all ways identical to the first version described above except for an additional marking consisting of a capitalized old German Script "F" engraved on the lens bezel as shown here: "f=85 mm F Zeiss-Opton". Both lenses had been very hard used and showed it as is typical of Contax lenses that performed well when originally made.
